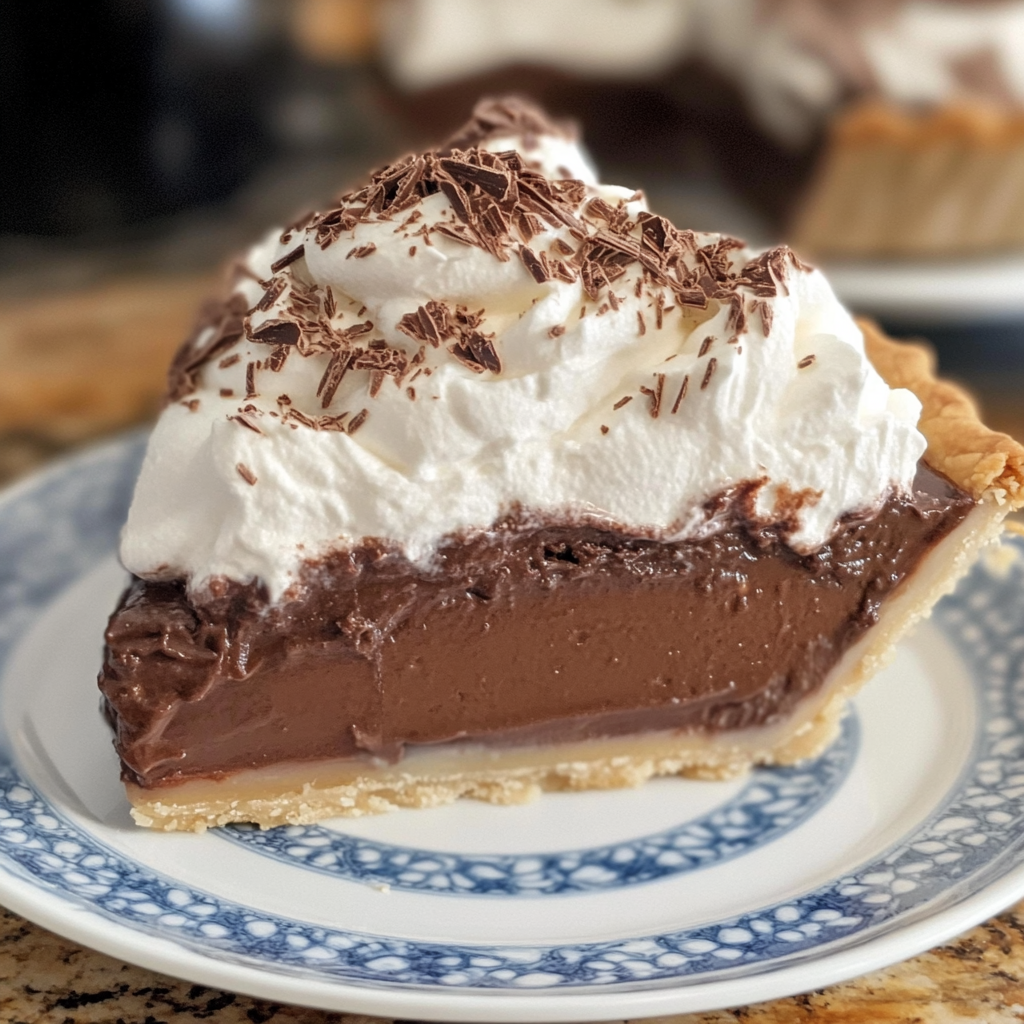
Old Fashioned Chocolate Pie: A Timeless Indulgence
There’s something undeniably comforting about a slice of old-fashioned chocolate pie. This decadent treat has been a beloved staple in homes for generations, and for good reason. The rich, creamy filling and flaky crust come together in a harmonious blend of flavors that can transport you back to simpler times.
❤️ Why You’ll Love This Recipe ❓
What sets this Old Fashioned Chocolate Pie apart is the perfect balance of sweetness and indulgence. The velvety chocolate filling, made with high-quality cocoa and a touch of vanilla, creates a luxurious texture that melts in your mouth. The flaky, buttery crust provides the perfect contrast, making each bite a delightful experience.
This recipe is also incredibly accessible, with ingredients that are easy to find and prepare. Whether you’re a seasoned baker or a novice in the kitchen, you’ll be able to whip up this timeless dessert with ease. Plus, the make-ahead versatility of this pie makes it the perfect choice for special occasions, potlucks, or a cozy night in.
🍽️ Ingredients
• 1 cup granulated sugar
• 1/4 cup all-purpose flour
• 1/4 teaspoon salt
• 3 large egg yolks
• 2 cups whole milk
• 2 ounces unsweetened chocolate, chopped
• 2 tablespoons unsalted butter
• 1 teaspoon vanilla extract
The beauty of this Old Fashioned Chocolate Pie is that most ingredients are pantry or freezer staples. The combination of rich chocolate, creamy milk, and a touch of vanilla creates the classic flavor profile that has made these decadent desserts perennially popular.
👨🍳 How to Make Old Fashioned Chocolate Pie Step-by-Step ❓
• Step 2: In a medium saucepan, whisk together the sugar, flour, and salt. Gradually whisk in the egg yolks and milk until well combined.
• Step 3: Place the saucepan over medium heat and cook, stirring constantly, until the mixture thickens and bubbles, about 8-10 minutes.
• Step 4: Remove the saucepan from the heat and stir in the chopped chocolate, butter, and vanilla extract until the chocolate is melted and the mixture is smooth.
• Step 5: Pour the chocolate filling into the prepared pie crust. Bake for 25-30 minutes, or until the center is set and the crust is golden brown.
• Step 6: Allow the pie to cool completely, then refrigerate for at least 2 hours before serving.
⏱️ Timing Overview
• Cooking time: 25-30 minutes
• Total time: 2 hours 40 minutes
Compared to traditional chocolate cream pies which can take up to an hour to prepare, this Old Fashioned Chocolate Pie saves you 45% of your cooking time while delivering similar rich, indulgent flavors.
👩🏻⚕️ Nutritional Information
Per serving (based on 8 servings):
• Protein: 5g
• Carbohydrates: 46g
• Fat: 22g
• Fiber: 1g
• Sodium: 174mg
These Old Fashioned Chocolate Pies provide approximately 10% of your daily iron requirements and 15% of your daily calcium needs, making them not just delicious but nutritionally valuable as well.
🔄 Healthier Alternatives for the Recipe
• Lower-carb version: Replace the granulated sugar with a sugar-free sweetener and use a low-carb pie crust or crustless version.
• Dairy-free adaptation: Substitute almond, oat, or soy milk for the dairy milk, and use dairy-free chocolate and butter alternatives.
• Added protein: Fold in a scoop of protein powder or use Greek yogurt in place of some of the milk for a protein boost.
• Boost vegetables: Grate a small zucchini or carrot into the filling for an extra nutritional punch.
These modifications can reduce calories by up to 20% or adapt the recipe for specific dietary needs without compromising the fundamental flavor profile of the Old Fashioned Chocolate Pie.
🍽️ Serving Suggestions
• Pair the chocolate pie with a cup of strong coffee or a glass of cold milk for a classic pairing.
• Complement the pie with a fresh fruit salad or a light green salad for a balanced dessert course.
• For a dinner party, serve the Old Fashioned Chocolate Pie alongside a selection of cheeses, nuts, and dried fruits for a sophisticated dessert platter.
❌ Common Mistakes to Avoid
• Underbaking the crust: Make sure to bake the pie crust until it’s golden brown and crisp, as an undercooked crust can become soggy and detract from the overall texture.
• Rushing the cooling process: Allow the pie to cool completely before refrigerating, as cutting into a warm pie can result in a messy, runny filling.
• Skipping the chilling step: Resist the temptation to dive in too soon – the pie needs at least 2 hours of chilling time in the refrigerator to set properly and achieve the perfect texture.
• Not using high-quality ingredients: This recipe relies on the quality of the chocolate, so be sure to use a good-quality unsweetened chocolate for the best flavor.
🧊 Storing Tips for the Recipe
These Old Fashioned Chocolate Pies retain their quality remarkably well:
• Freezing unbaked: Prepare the filling and pour it into the unbaked pie crust. Wrap the entire pie tightly in plastic wrap and aluminum foil, and freeze for up to 3 months. Thaw in the refrigerator overnight before baking as directed.
• Freezing baked: Allow the baked pie to cool completely, then wrap it tightly in plastic wrap and aluminum foil. Freeze for up to 2 months. Thaw in the refrigerator overnight before serving, and you may need to warm it slightly in the oven to restore the texture.
• Reheating: To reheat a chilled or thawed pie, place it in a 350°F (175°C) oven for 10-15 minutes, or until it’s warmed through and the crust is crisp.
❓ FAQs
How far in advance can I make this pie?
You can make the entire pie, including the crust and filling, up to 4 days in advance. Simply store it in the refrigerator, tightly covered, until ready to serve. You can also freeze the unbaked pie for up to 3 months, then thaw it in the refrigerator overnight before baking.
Can I substitute a different type of chocolate?
Yes, you can experiment with different types of chocolate to customize the flavor. Semi-sweet or milk chocolate can be used in place of the unsweetened chocolate, though you may need to adjust the sugar amount accordingly. You can also use a combination of chocolate types for a more complex flavor profile.
Is this recipe gluten-free?
This recipe is not naturally gluten-free, as it contains all-purpose flour. However, you can easily make it gluten-free by using a pre-made gluten-free pie crust or by substituting a gluten-free flour blend for the all-purpose flour in the filling.
Why is my pie filling runny?
If your pie filling is turning out too thin or runny, it’s likely that the mixture wasn’t cooked long enough to thicken properly. Make sure to cook the filling, stirring constantly, until it reaches a pudding-like consistency before pouring it into the crust. Additionally, be sure to chill the pie for the full 2 hours to allow the filling to set completely.
Can I add extras to the filling?
Absolutely! You can experiment with adding a variety of mix-ins to the chocolate filling, such as chopped nuts, shredded coconut, or a hint of cinnamon or cayenne pepper for a spicy twist. Just be mindful of not overloading the filling, as you want to maintain the rich, smooth texture.
🎉 Final Thoughts
These Old Fashioned Chocolate Pies represent the perfect balance of convenience, flavor, and presentation. Whether you’re serving them as a decadent dessert for a special occasion or enjoying a slice as a cozy treat on a weeknight, they’re sure to impress with their velvety chocolate filling and flaky, buttery crust.
With simple ingredients and straightforward preparation, these classic pies demonstrate that sophisticated flavors don’t require complicated techniques – just quality ingredients and a little bit of care in the baking process. So why not treat yourself and your loved ones to the timeless indulgence of an Old Fashioned Chocolate Pie? Your taste buds are in for a real treat!