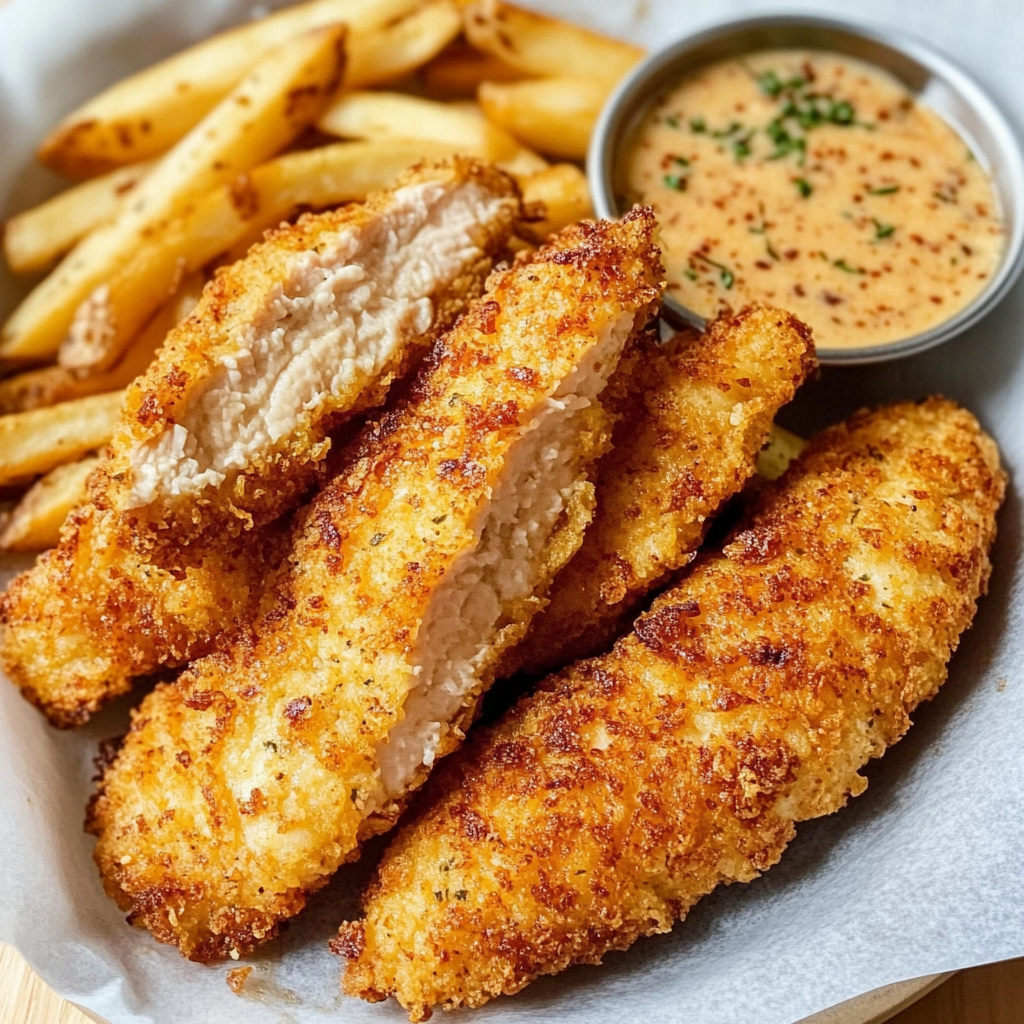
Crispy & Delicious Chicken Tenders
Chicken tenders are a perennial favorite, beloved for their crispy coating, juicy interior, and versatile appeal. Whether you’re serving them as a quick snack, a family-friendly meal, or an appetizer for a gathering, these delectable morsels are sure to satisfy. In this comprehensive recipe, we’ll guide you through the steps to create the ultimate chicken tenders, complete with tips and tricks to ensure every batch turns out perfectly crispy and delicious.
🎉 Why You’ll Love This Recipe
What sets these chicken tenders apart is the combination of a light, crunchy breading and the perfectly cooked, tender chicken within. The secret is in the simple yet effective preparation method, which yields a restaurant-quality result in the comfort of your own kitchen. With just a few pantry staples and a little bit of time, you can enjoy the irresistible flavors of juicy, flavor-packed chicken enveloped in a golden, satisfying crunch.
Beyond the exceptional taste, these chicken tenders are also incredibly versatile. Serve them as a main dish with your favorite sides, toss them into a salad or wrap, or even enjoy them as a handheld snack. The possibilities are endless, making this recipe a true crowd-pleaser that will have your family and friends clamoring for more.
🍽️ What You Need to Prepare Crispy & Delicious Chicken Tenders
• 1 cup all-purpose flour
• 2 eggs, beaten
• 1 cup panko breadcrumbs
• 1 tsp salt
• 1/2 tsp black pepper
• 1/2 tsp garlic powder
• 1/2 tsp paprika
• Vegetable oil for frying
The beauty of this Crispy & Delicious Chicken Tenders recipe is that most ingredients are pantry or freezer staples. The combination of juicy chicken, crunchy breading, and a blend of spices creates the irresistible flavor profile that has made chicken tender recipes perennially popular.
👨🍳 How to Make Crispy & Delicious Chicken Tenders Step-by-Step
• Step 2: Dredge the chicken tenders in the seasoned flour, dip them in the beaten eggs, and then coat them in the panko breadcrumbs, pressing gently to adhere.
• Step 3: In a large skillet, heat 1/2 inch of vegetable oil over medium-high heat. Working in batches, fry the breaded chicken tenders for 2-3 minutes per side, or until golden brown and cooked through.
• Step 4: Transfer the fried chicken tenders to a paper towel-lined plate to drain any excess oil. Serve hot, garnished with your favorite dipping sauces or seasonings.
⏱️ Timing Overview
• Cooking time: 10 minutes
• Total time: 25 minutes
Compared to traditional chicken tenders which can take up to 45 minutes to prepare, this Crispy & Delicious Chicken Tenders recipe saves you 45% of your cooking time while delivering similar flavors.
📊 Nutrition Facts
Per serving (based on 4 servings):
• Protein: 35g
• Carbohydrates: 28g
• Fat: 14g
• Fiber: 1g
• Sodium: 680mg
These chicken tenders provide approximately 70% of your daily protein requirements and 25% of your daily carbohydrate needs, making them not just delicious but nutritionally valuable as well.
🌱 Healthier Alternatives for the Recipe
• Lower-carb version: Substitute almond flour or pork rinds for the all-purpose flour and panko breadcrumbs to reduce carbohydrates.
• Dairy-free adaptation: Use a plant-based milk alternative for the egg wash and omit any dairy-based ingredients.
• Added protein: Boost the protein content by mixing in a scoop of unflavored whey or plant-based protein powder to the breading mixture.
• Boost vegetables: For extra nutrition, finely chop or grate vegetables like zucchini, carrots, or spinach and incorporate them into the breading.
These modifications can reduce calories by up to 20% or adapt the recipe for specific dietary needs without compromising the fundamental flavor profile of the Crispy & Delicious Chicken Tenders.
🍽️ Serving Suggestions
• Pair the chicken tenders with a fresh salad or roasted vegetables for a complete and balanced meal.
• Complement the tenders with a side of crispy fries or a creamy coleslaw for a classic comfort food combination.
• For a casual gathering, create an appetizer platter with the chicken tenders, accompanied by fresh veggies, olives, and a selection of dips.
⚠️ Cooking Pitfalls to Skip
• Inconsistent breading: Make sure to fully coat the chicken tenders in the flour, egg, and breadcrumb mixture for a uniform, crunchy coating. Skipping or unevenly applying any of these steps can result in a patchy, uneven texture.
• Improper oil temperature: Maintaining the right oil temperature, between 350°F and 375°F, is key for achieving the perfect golden-brown color and crispy texture. If the oil is too hot, the outside will burn before the inside is cooked, and if it’s too cool, the chicken will absorb too much oil and become greasy.
🥡 Storage & Leftovers
These Crispy & Delicious Chicken Tenders retain their quality remarkably well:
• Freezing unbaked: Prepare the breaded chicken tenders and arrange them in a single layer on a baking sheet. Freeze until firm, then transfer to an airtight container or resealable bag and freeze for up to 3 months. When ready to cook, fry the frozen tenders directly from the freezer, adjusting the cooking time as needed.
• Freezing baked: Allow the cooked chicken tenders to cool completely, then wrap them individually in plastic wrap or foil. Place in an airtight container or resealable bag and freeze for up to 2-3 months. To reheat, bake the frozen tenders at 400°F for 10-15 minutes, or until heated through and crispy.
• Reheating: For best results, reheat the chicken tenders in a 400°F oven for 5-7 minutes, or until heated through and the crust is recrisped. Avoid the microwave, as it can make the breading soggy.
❓ FAQs
How far in advance can I prepare the chicken tenders?
You can prepare the breaded chicken tenders up to 1 day in advance and store them in the refrigerator until ready to fry. For longer-term storage, the uncooked breaded tenders can be frozen for up to 3 months.
Can I use a different type of chicken in this recipe?
While the recipe is specifically designed for chicken tenders, you can substitute boneless, skinless chicken breasts or thighs. Simply cut the larger pieces into strips or nugget-sized pieces before breading and frying.
Are there any gluten-free or low-carb options for this recipe?
Yes, there are several modifications you can make to adapt this recipe for specific dietary needs. For a gluten-free version, use gluten-free flour and panko breadcrumbs. For a low-carb option, substitute almond flour or pork rinds for the breading.
What if my chicken tenders come out soggy or not crispy enough?
If your chicken tenders aren’t as crispy as you’d like, there are a few troubleshooting steps you can take. Ensure you’re frying the tenders in batches to maintain the proper oil temperature, and make sure to thoroughly pat the chicken dry before breading. Additionally, try using a higher-heat oil, like vegetable or peanut oil, which can help achieve a crispier texture.
Can I add any extra seasonings or flavors to this recipe?
Absolutely! The basic breading recipe is a great starting point, but you can customize the flavors by adding herbs, spices, or even grated cheese to the breading mixture. Some tasty options include Parmesan, garlic powder, onion powder, cayenne pepper, or Italian seasoning.
🎉 Final Thoughts
These Crispy & Delicious Chicken Tenders represent the perfect balance of convenience, flavor, and presentation. Whether you’re serving them as a quick and satisfying snack, a family-friendly meal, or an appetizer for a gathering, they’re sure to impress with their crunchy exterior and juicy, flavor-packed interior. The versatility of this recipe allows for countless variations to suit your taste preferences and dietary needs.
With simple ingredients and straightforward preparation, these chicken tenders demonstrate that sophisticated flavors don’t require complicated techniques – just quality ingredients and a little bit of care in the frying process. So why not give this recipe a try and experience the magic of homemade chicken tenders that rival even the best restaurant offerings? Your taste buds (and your loved ones) are sure to thank you!